Hosting Web Setup Guide
Follow these step-by-step instructions to set up and deploy the SnapReels web server on your hosting provider panel.
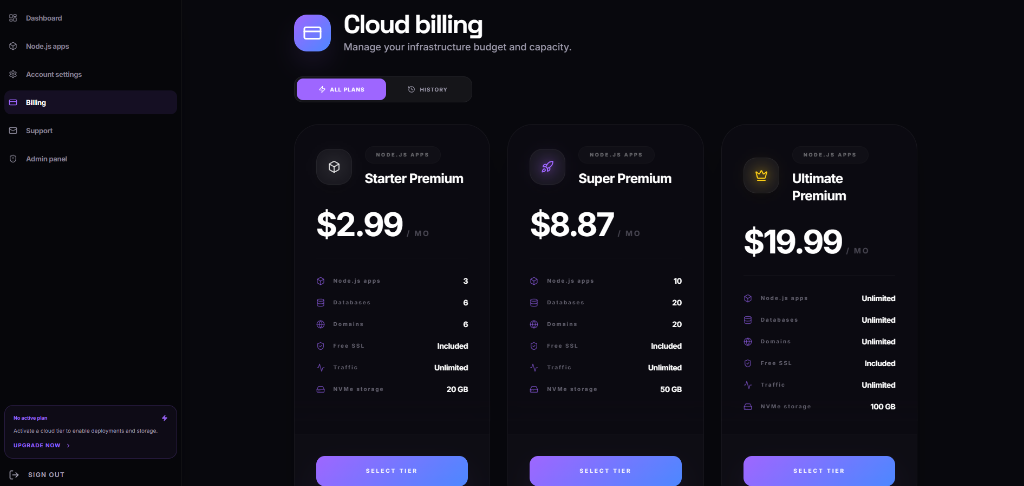
Create Gadohost Account & Select Plan
The first step is to create an account on Gadohost.com. Gadohost provides optimized, high-performance cloud hosting suitable for deploying the Node.js API and web backend of SnapReels.
Once registered, navigate to the Billing section and select the Starter Premium plan (Plan 1) as a starting point. This plan includes support for up to 3 Node.js applications, 6 databases, free SSL certificates, and 20 GB of fast NVMe storage, which is perfectly sufficient for launching your SnapReels platform.
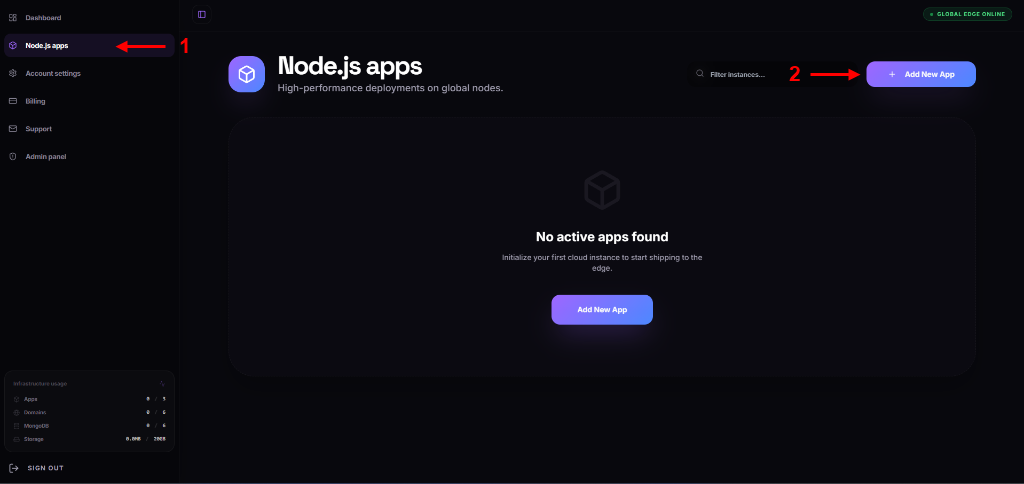
Access Node.js Section & Create New App
Once you have selected your cloud hosting tier, we need to initialize a container for our Node.js server.
Follow these steps:
- From the left sidebar navigation menu, click on Node.js apps (Indicated by arrow 1).
- This will open your application dashboard. Click on the purple + Add New App button in the top right corner (Indicated by arrow 2) or in the center card area to begin configuring your new deployment.
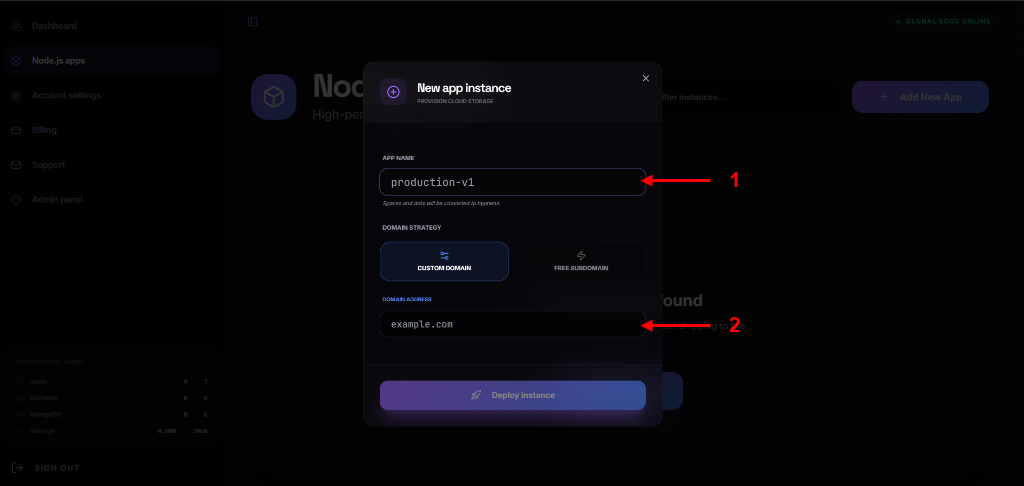
Configure App Instance & Domain Settings
After clicking the + Add New App button, a configuration modal will appear to provision your new cloud app instance.
Configure the following settings carefully:
- In the APP NAME field (Indicated by arrow 1), type the name of your application (e.g.,
snapreelsorproduction-v1). Spaces and dots will be converted to hyphens automatically. - Under DOMAIN STRATEGY, select CUSTOM DOMAIN.
- In the DOMAIN ADDRESS field (Indicated by arrow 2), type your registered domain address (e.g.,
yourdomain.com). - Click the blue Deploy instance button at the bottom to start provisioning your server.
CRITICAL DNS NAMESERVERS SETUP
IMPORTANT: For Gadohost to route your custom domain correctly, you must update the nameservers at the registrar panel where you purchased your domain (e.g., Namecheap, GoDaddy, Dynadot, Hostinger, etc.).
Log in to your domain registrar dashboard, manage your domain, find the Custom DNS / Nameservers section, and set them to:
ns1.gadohost.com
ns2.gadohost.com
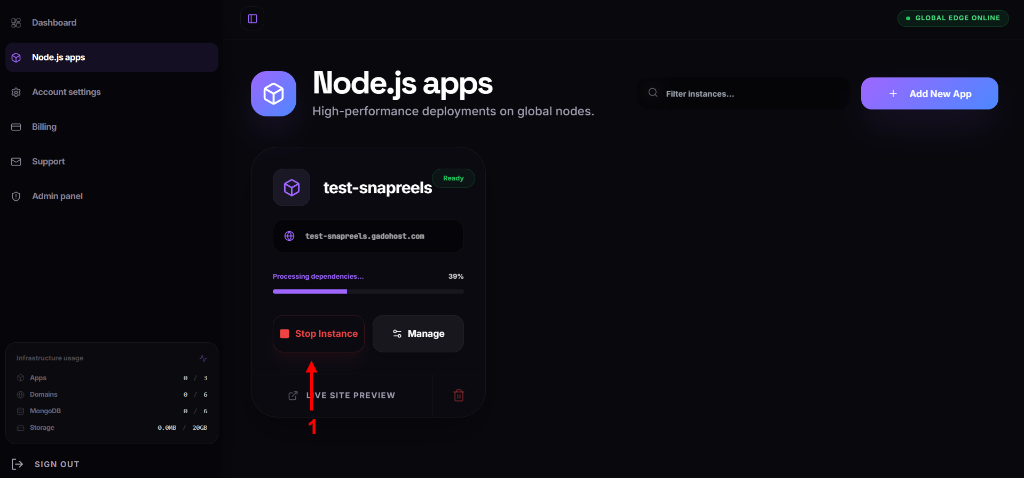
Stop Default App Installation
As soon as you click the Deploy instance button, Gadohost will automatically start setting up a default node test page and installing default dependencies (indicated by the progress bar e.g. Processing dependencies... 39%).
You must stop this default process immediately:
- Wait for the app card to appear on your dashboard.
- Click the red Stop Instance button (Indicated by arrow 1). This prevents the server from building the default template, allowing us to upload our own clean SnapReels project files in the next steps.
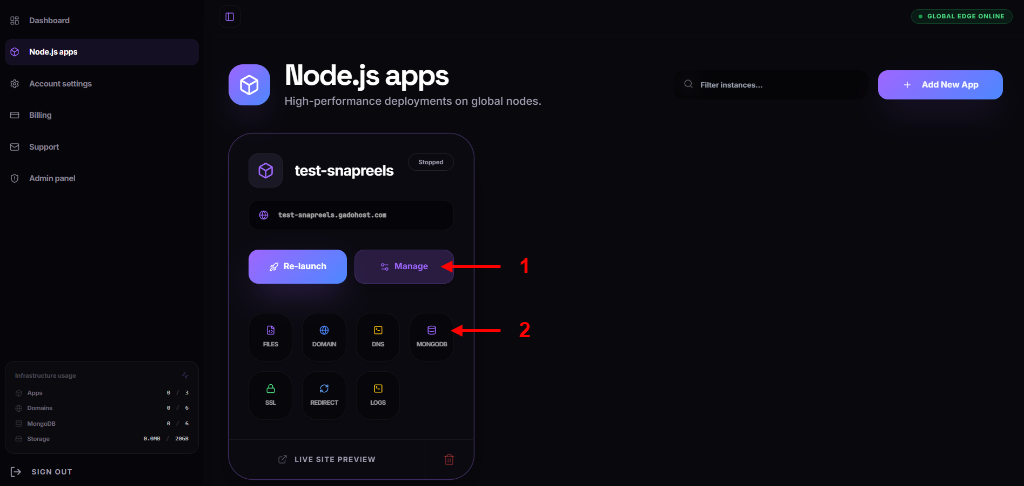
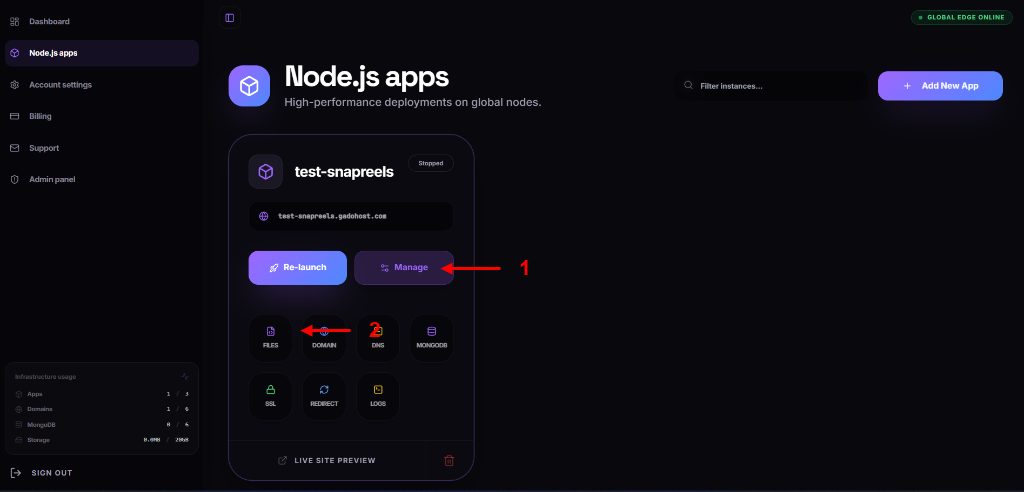
Access Application Management & Select MongoDB
After stopping the default app instance, we need to set up the MongoDB database for our SnapReels backend.
Follow these steps to access the database options:
- On your stopped application card, click the purple Manage button (Indicated by arrow 1). This will expand a settings panel displaying various service controls.
- From the expanded settings row, click on the purple MONGODB icon (Indicated by arrow 2). This will navigate you to the database setup interface where we will create our database credentials.
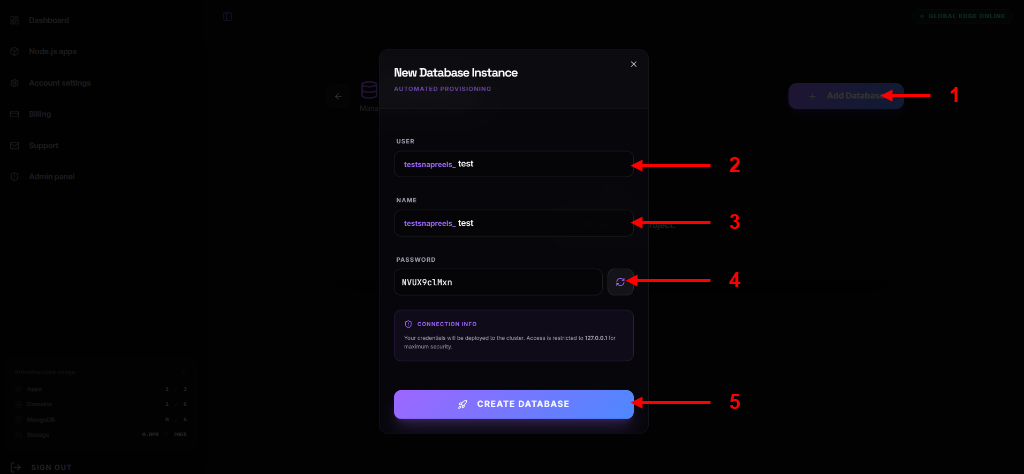
Create MongoDB Database Instance
Now, we will provision a new MongoDB database instance for storing SnapReels users, videos, comments, and settings.
Follow these configuration steps carefully:
- On the MongoDB databases page, click the purple + Add Database button in the top right corner of the background (Indicated by arrow 1). This will open the database creation modal.
- In the USER field (Indicated by arrow 2), type the username for your database (e.g.,
yourusernameortestsnapreels_test). - In the NAME field (Indicated by arrow 3), type the name of the database (e.g.,
yourdbnameortestsnapreels_test). It is usually a good practice to keep the database name and user identical. - Next to the PASSWORD field, click the reload/generate icon (Indicated by arrow 4) to generate a secure database password. Make sure to copy and save this password somewhere safe! We will need it shortly to configure the MongoDB connection URI in our project environment file.
- Finally, click the blue CREATE DATABASE button (Indicated by arrow 5) at the bottom to finalize and provision the database.
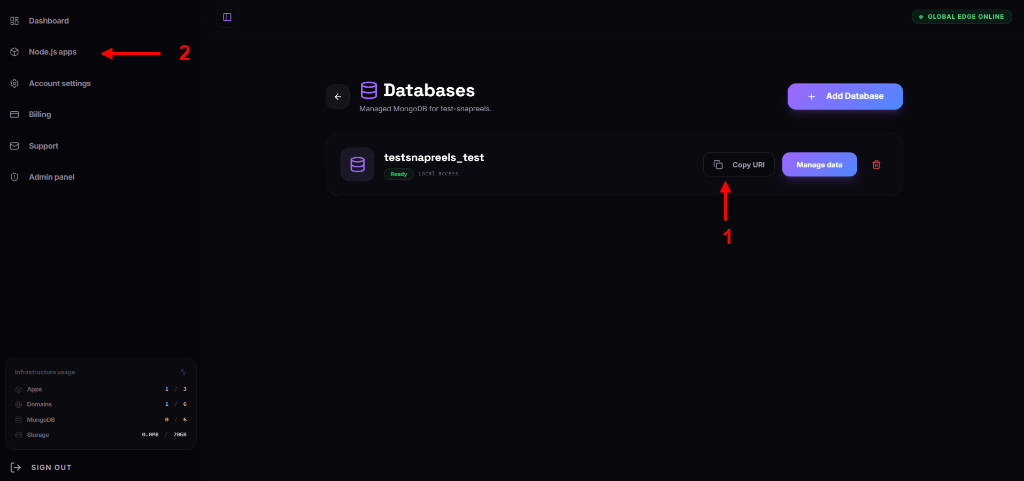
Copy MongoDB Connection URI & Navigate Back
Once the database is successfully created, it will appear in your Databases list. We need to copy its connection URI so that we can link our Node.js app to this database.
Follow these steps:
- Locate your new database in the list and click the grey Copy URI button (Indicated by arrow 1). This will copy the MongoDB connection string to your clipboard. Save this string alongside your password, as we will use it to configure our environment variables.
- After copying the URI, navigate back to your applications list by clicking on Node.js apps in the left sidebar menu (Indicated by arrow 2).
Open Application Files Manager
With our database created and stopped application instance ready, we can now access the server's files directory to upload the SnapReels backend code.
Follow these steps:
- On the applications dashboard, click the purple Manage button on your app card (Indicated by arrow 1) to expand the settings menu.
- Click on the purple FILES icon (Indicated by arrow 2) which is the first option in the row. This will open the Gadohost file manager for your Node.js application instance.
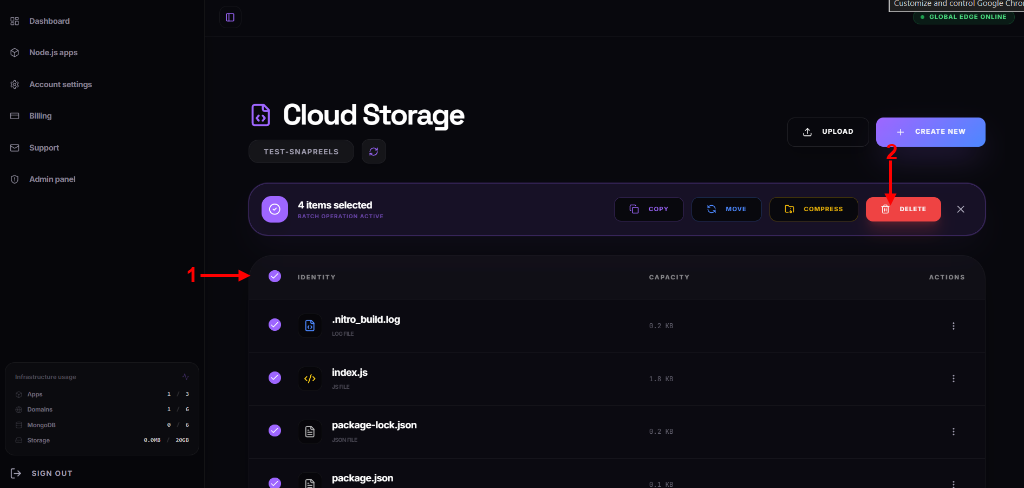
Delete Default Application Files
When you first open your application's file manager, you will notice a few default boilerplate files and folders (such as index.js, package.json, etc.). We need to delete these files to ensure a clean workspace before uploading our project files.
Follow these steps to clean the directory:
- Check the Select All checkbox in the table header next to "IDENTITY" (Indicated by arrow 1). This will select all the default files in the folder.
- With the files selected, a purple batch operation toolbar will appear. Click the red DELETE button in this toolbar (Indicated by arrow 2) and confirm the deletion.
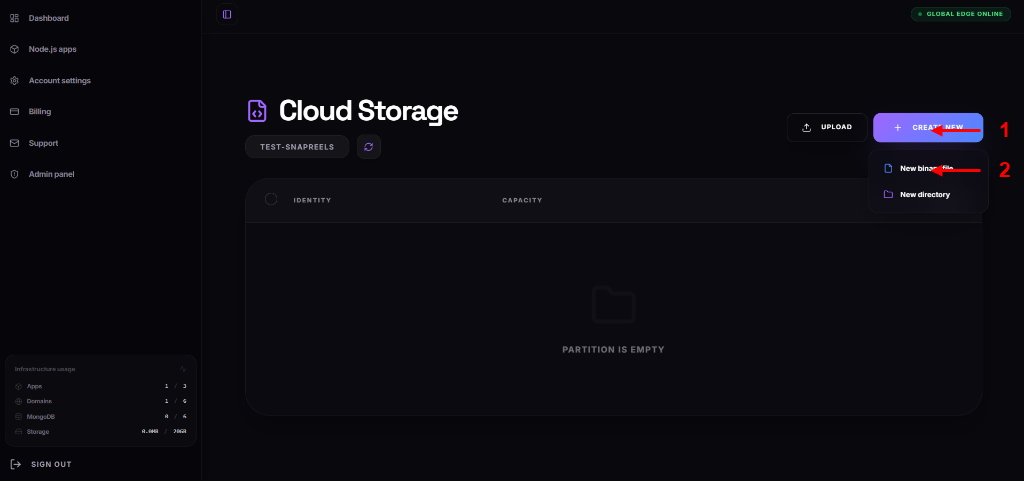
Create New Environment File
Now that our file manager is clean, we need to create a new environment variable file (.env) to hold our database credentials and configuration keys.
Follow these steps to initialize the file creation:
- Click the blue + CREATE NEW button at the top right of the file manager header (Indicated by arrow 1). This will expand a dropdown menu.
- From the dropdown menu, select New binary file (Indicated by arrow 2).
Name Environment File & Deploy
After clicking New binary file, a modal will prompt you to enter the name of the new file.
Follow these steps to deploy the file:
- In the LABEL text box (Indicated by arrow 1), type exactly:
.env(make sure to include the leading dot). - Click the blue DEPLOY button (Indicated by arrow 2) to create the file in your server root directory.

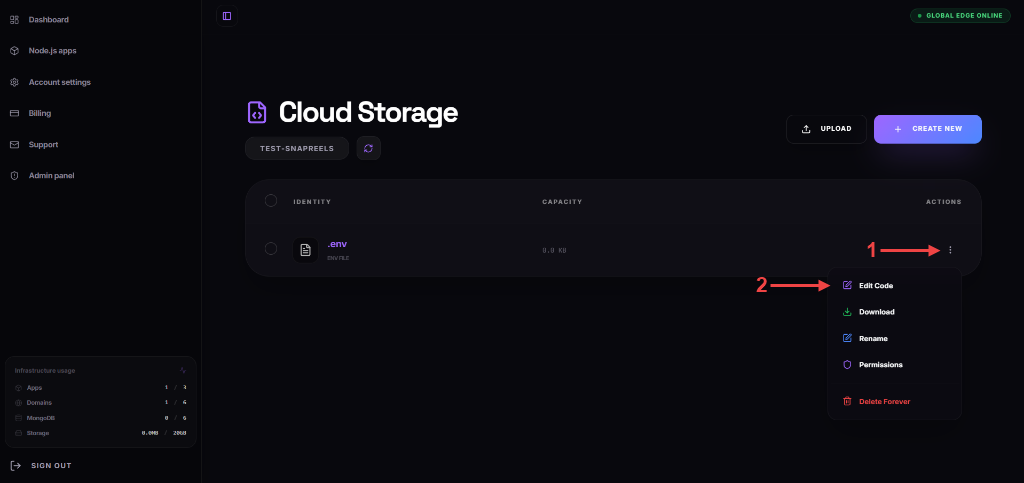
Open Environment File for Editing
Now that the .env file is created, you need to open it and configure the database connection.
Follow these steps to edit the file:
- Click the three dots (...) on the right side of the
.envfile row (Indicated by arrow 1). - Select the Edit Code option from the dropdown menu (Indicated by arrow 2).
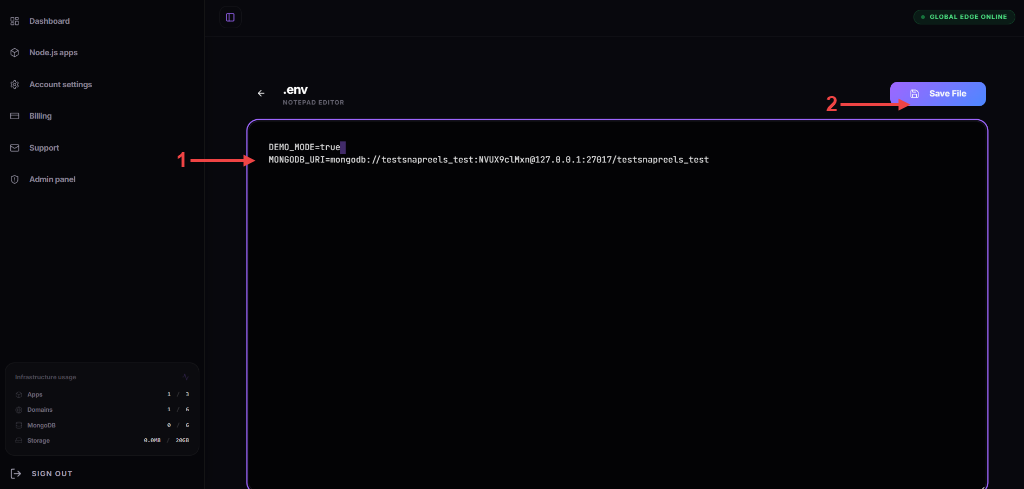
Configure Environment Variables & Save
Paste the following environment variables template inside the file editor:
DEMO_MODE=false
MONGODB_URI=
Follow these steps to configure and save:
- Paste the copied template. In the
MONGODB_URIfield (Indicated by arrow 1), paste the MongoDB Connection URI that you copied in Step 7. Make sure it looks likeMONGODB_URI=mongodb://.... - Click the blue Save File button in the top-right corner (Indicated by arrow 2) to save your configurations.
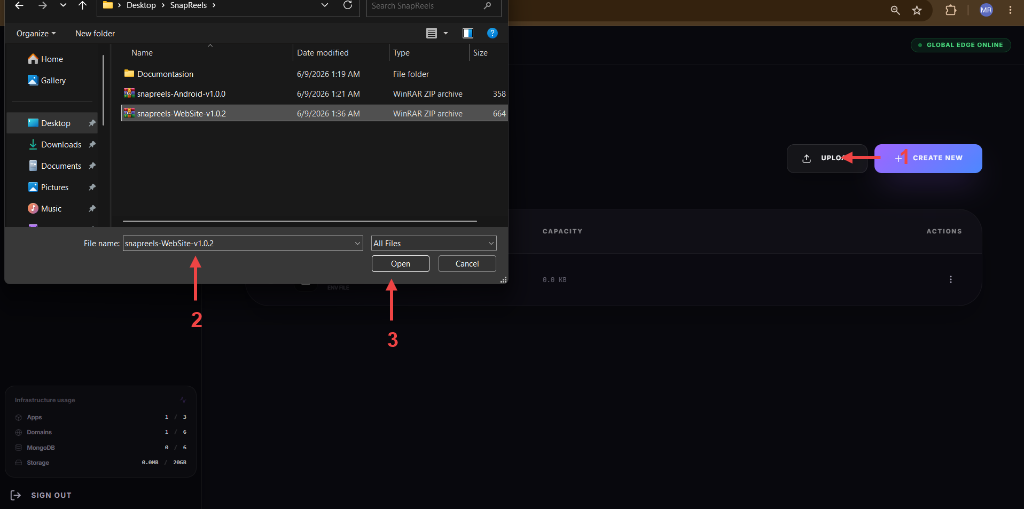
Upload Website Code Archive
Now, you need to upload the website project code archive to your Gadohost Cloud Storage.
Follow these steps to upload the file:
- Click the grey UPLOAD button located at the top-right corner of the Cloud Storage interface (Indicated by arrow 1).
- In the system file dialog that pops up, select the website zip package: snapreels-WebSite-v1.0.2 (Indicated by arrow 2).
- Click the Open button at the bottom of the file dialog (Indicated by arrow 3) to start uploading the archive.
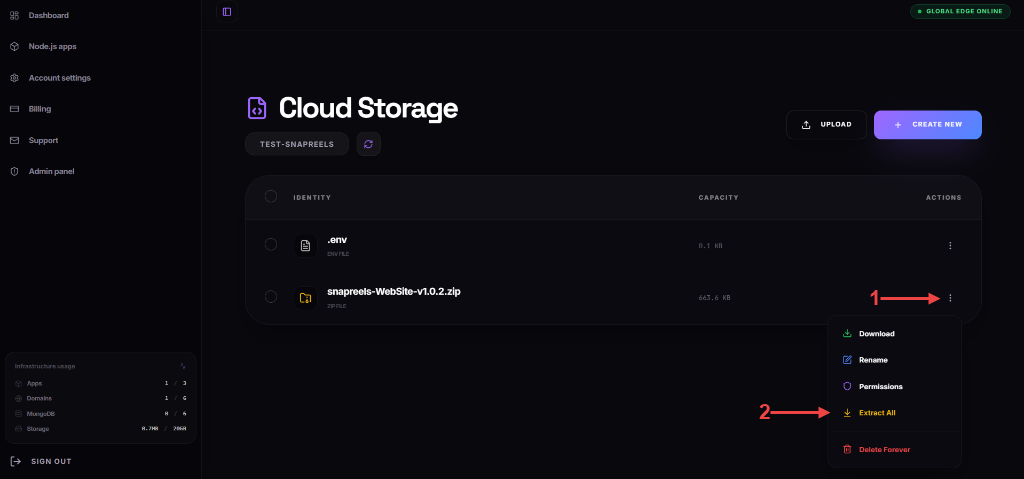
Extract Website Code Archive
Once the upload is complete, you need to extract the website code files into your server root directory.
Follow these steps to extract the archive:
- Click the three dots (...) on the right side of the
snapreels-WebSite-v1.0.2.zipfile row (Indicated by arrow 1). - Select the yellow Extract All option from the dropdown menu (Indicated by arrow 2).
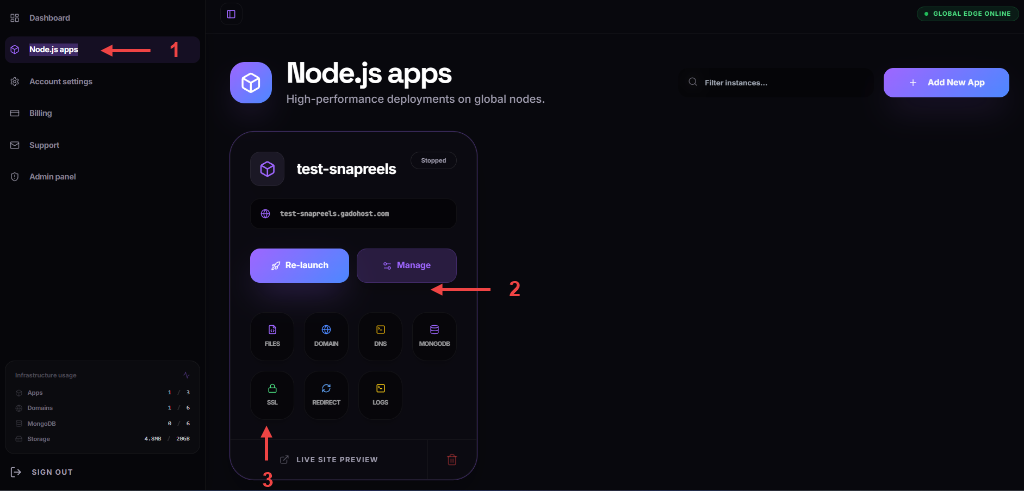
Configure SSL Certificate
To secure your application with HTTPS, you need to configure an SSL certificate for your domain.
Follow these steps to access SSL configuration:
- Navigate to the Node.js apps section in the sidebar menu (Indicated by arrow 1).
- On your app instance card, click the purple Manage button (Indicated by arrow 2) to open the control options.
- Click the green SSL button in the bottom grid (Indicated by arrow 3) to start generating or installing your SSL certificate.
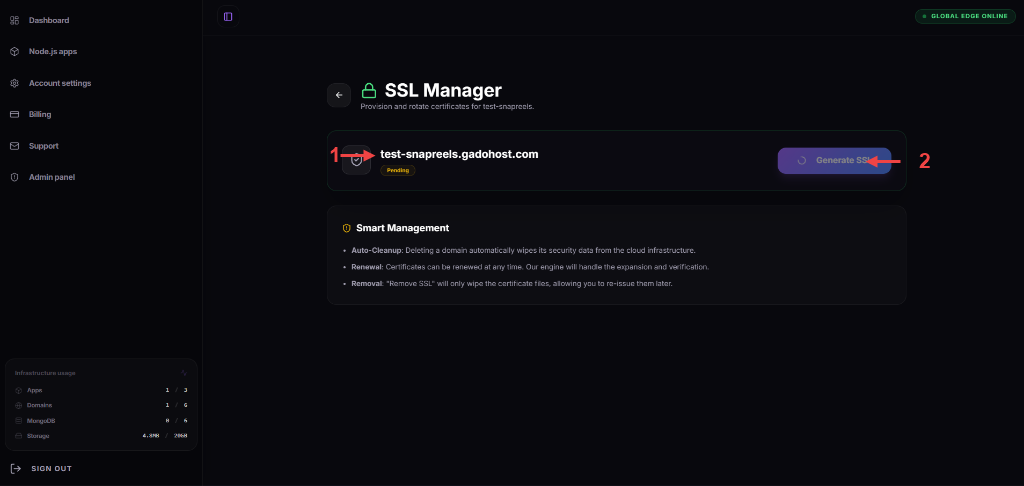
Verify Name Servers & Generate Free SSL
Before generating the free SSL certificate, you must ensure that your custom domain has been configured with the correct Gadohost name servers:
- ns1.gadohost.com
- ns2.gadohost.com
Follow these steps to generate your SSL certificate:
- Locate your custom domain in the list (Indicated by arrow 1) and verify that it matches your app instance. Make sure the status badge shows yellow Pending (indicating the nameservers are pointed correctly).
- Click the blue Generate SSL button on the right side of the domain card (Indicated by arrow 2) to request and apply your free Let's Encrypt SSL certificate.
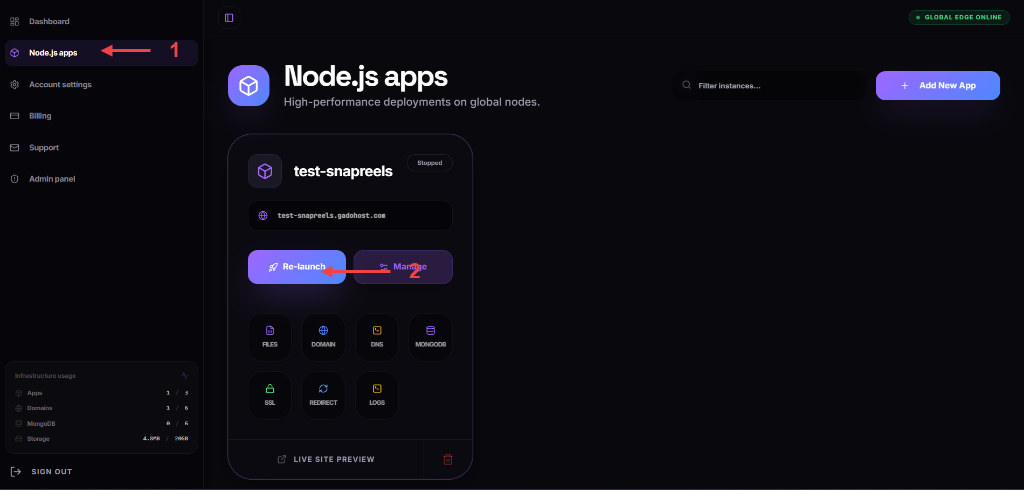
Re-launch Application
After setting up the environment variables and the SSL certificate, you need to restart the application instance to apply the changes.
Follow these steps to re-launch:
- Go to the Node.js apps section in the sidebar menu (Indicated by arrow 1).
- Click the blue Re-launch button on your app card (Indicated by arrow 2).
- Wait about 5 minutes for the installation and build process to complete. You will see a progress bar indicating the status.
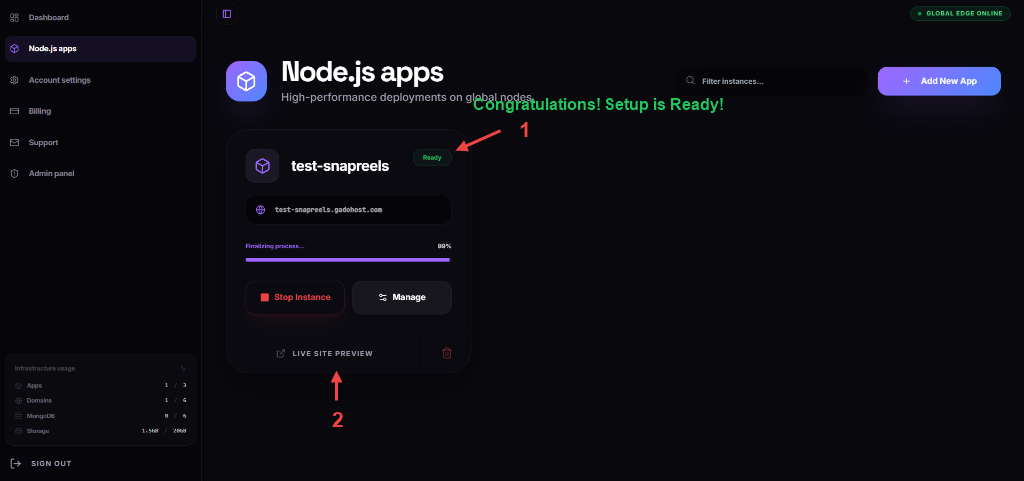
Setup Successful & Preview Live Site
Once the build process is complete, the application status will change to indicate it is running successfully.
Follow these final steps:
- Verify that the status badge at the top of the card shows green Ready (Indicated by arrow 1). Congratulations! The installation was successful.
- Click the LIVE SITE PREVIEW link at the bottom of the card (Indicated by arrow 2) to open and test your live website immediately!
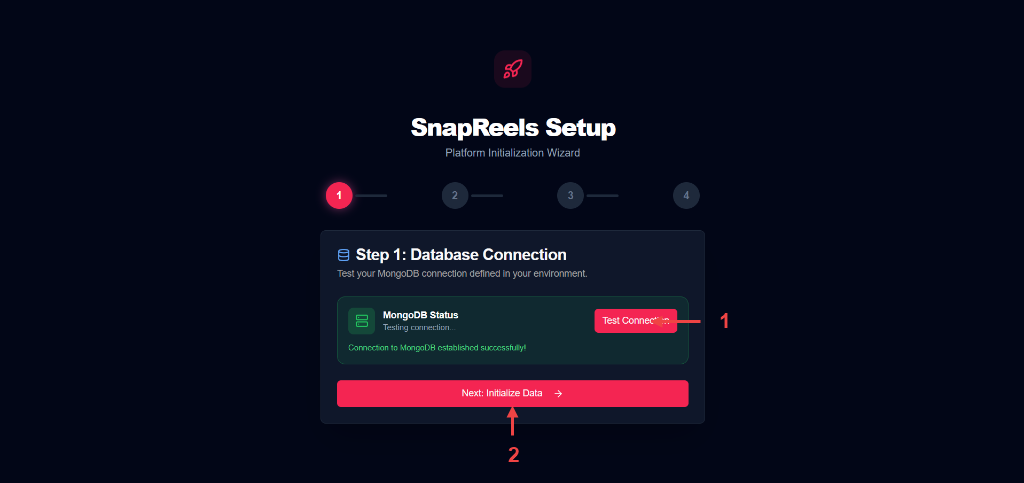
Setup Step 1: Database Connection
When you open your website for the first time, you will be greeted by the SnapReels Platform Initialization Wizard. The first step is to test your MongoDB connection.
Follow these steps:
- Click the red Test Connection button (Indicated by arrow 1) to verify that your website can connect to your MongoDB database successfully.
- Once you see the green success message "Connection to MongoDB established successfully!", click the pink Next: Initialize Data button at the bottom (Indicated by arrow 2).
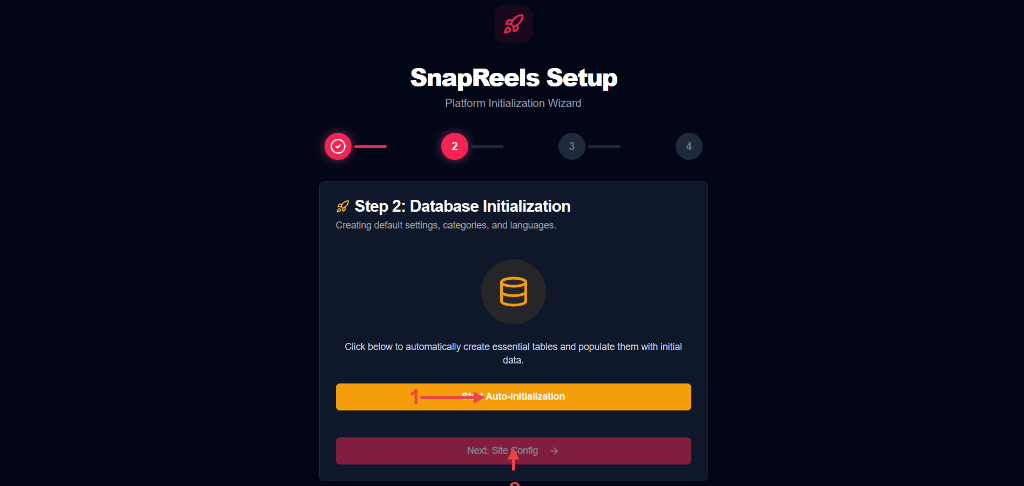
Setup Step 2: Database Initialization
In this step, we will populate the database with default settings, categories, and languages required for SnapReels to function.
Follow these steps:
- Click the orange Start Auto-Initialization button (Indicated by arrow 1) to automatically create essential tables and insert initial data.
- Wait for the database installation process to finish. Once completed, click the pink Next: Site Config button at the bottom (Indicated by arrow 2) to proceed.
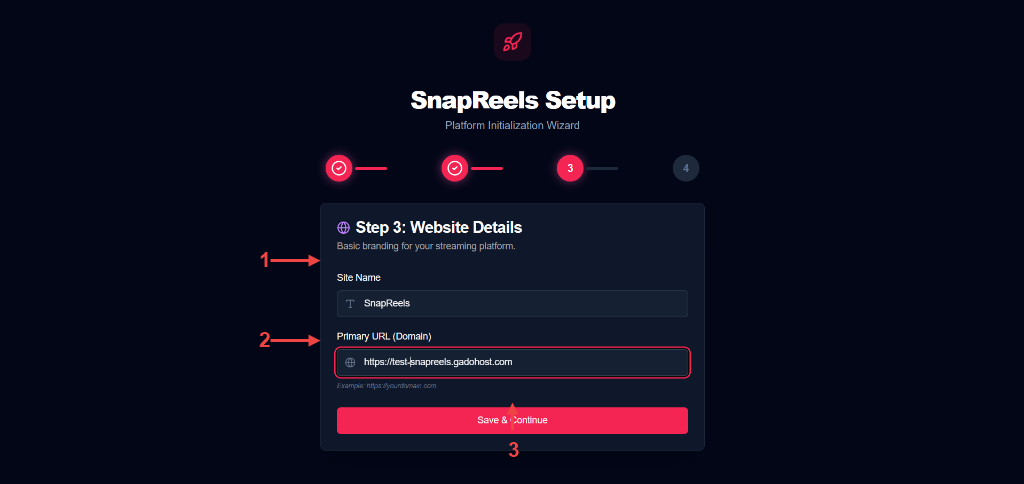
Setup Step 3: Website Details
Now configure the basic branding and domain configuration for your streaming platform.
Follow these steps:
- Enter your desired website title in the Site Name field (Indicated by arrow 1).
- Enter the primary URL (domain) of your website in the Primary URL (Domain) field (Indicated by arrow 2), make sure it is exactly your domain.
- Click the pink Save & Continue button (Indicated by arrow 3) to save these details.
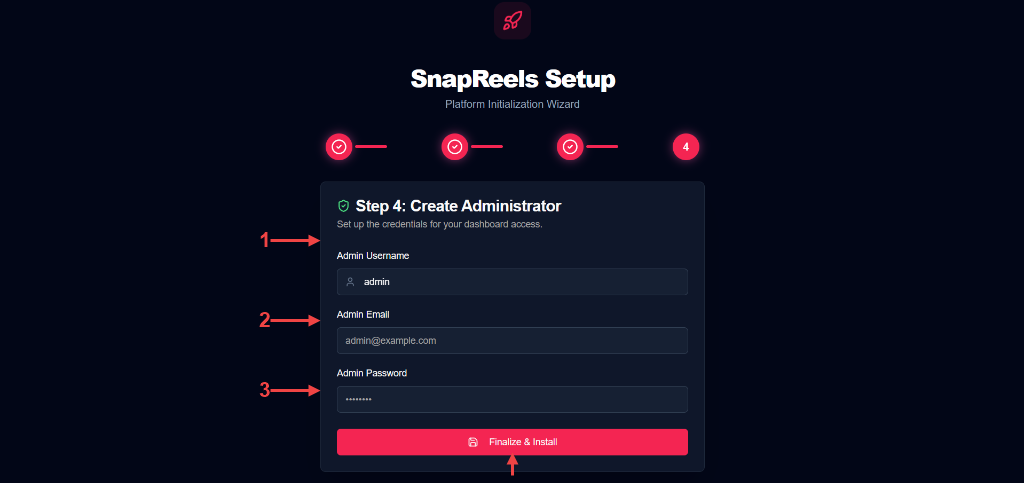
Setup Step 4: Create Administrator
Set up the administrator credentials to access your dashboard and manage the streaming platform.
Follow these steps:
- Enter your desired administrator username in the Admin Username field (Indicated by arrow 1).
- Enter your email address in the Admin Email field (Indicated by arrow 2).
- Enter a secure password in the Admin Password field (Indicated by arrow 3).
- Click the pink Finalize & Install button (Indicated by arrow 4) to complete the installation.
Congratulations! Setup is complete. Now go to your admin link /admin to manage your site.
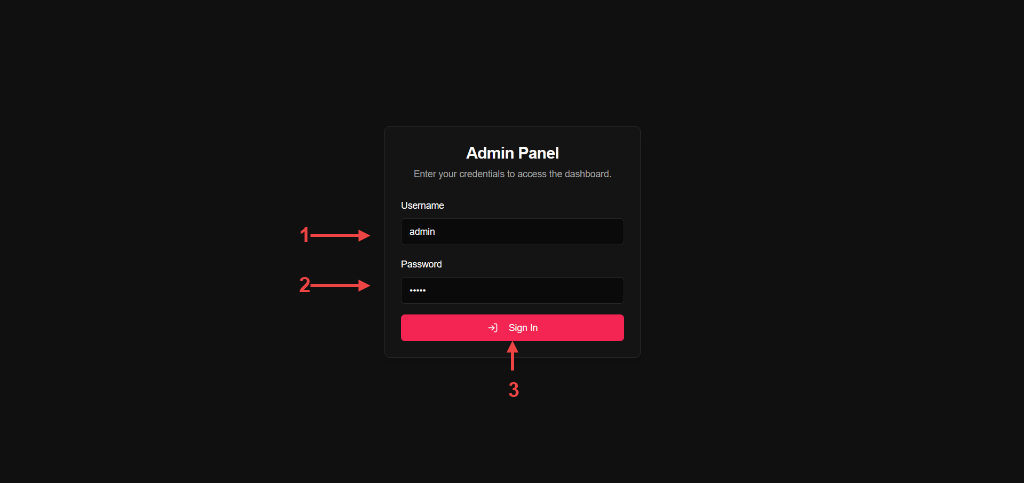
Setup Step 5: Admin Panel Login
Access your admin panel dashboard to configure and customize your streaming platform.
Follow these steps:
- Enter the administrator Username you created in the previous step (Indicated by arrow 1).
- Enter the administrator Password (Indicated by arrow 2).
- Click the pink Sign In button (Indicated by arrow 3) to log into the Admin Panel.
Firebase Configuration Setup
Follow these steps to configure your Firebase Project for social authentication and server communications.
Create a Project at Firebase Console
To initialize Firebase services for your website, you must create a new project in the Google Firebase developer portal.
Follow these steps:
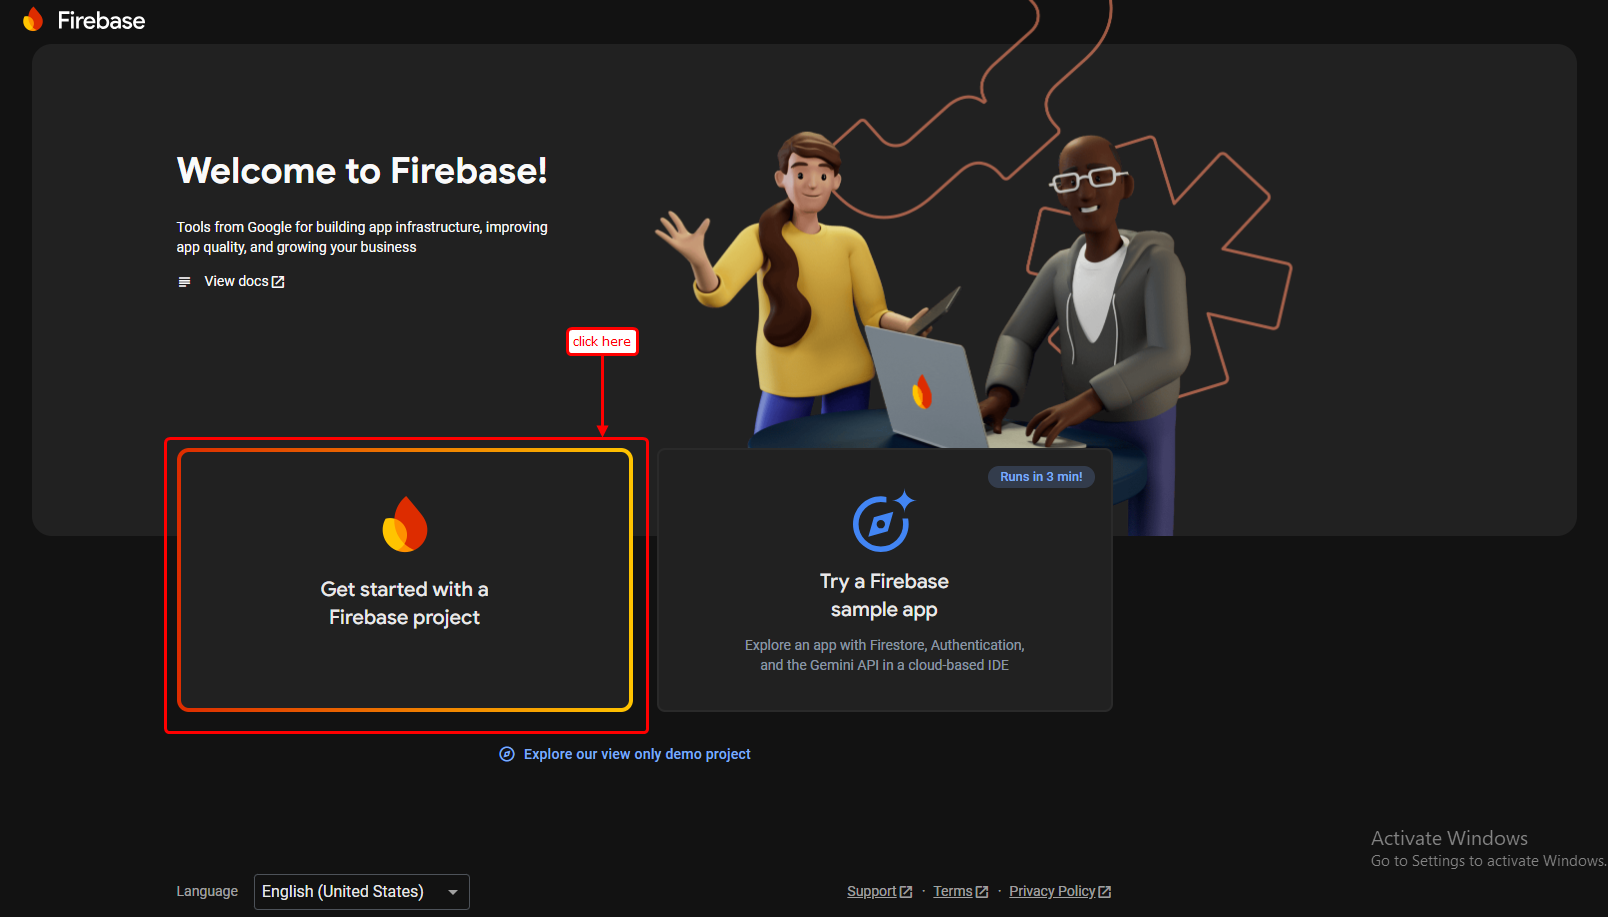
- Navigate to the Firebase Console.
- Click the card Get started with a Firebase project or Create a project (Indicated by the red highlight).
Enter Project Name & Accept Terms
Choose a name for your Firebase project to distinguish it in your developer dashboard.
Follow these steps:
- In the Enter your project name field (Indicated by arrow), type your desired project name (e.g.,
SnapReels). - Check both checkboxes (Indicated by the red boxes) to accept the Firebase Terms and confirm your business use.
- Click the Continue button at the bottom (Indicated by arrow).

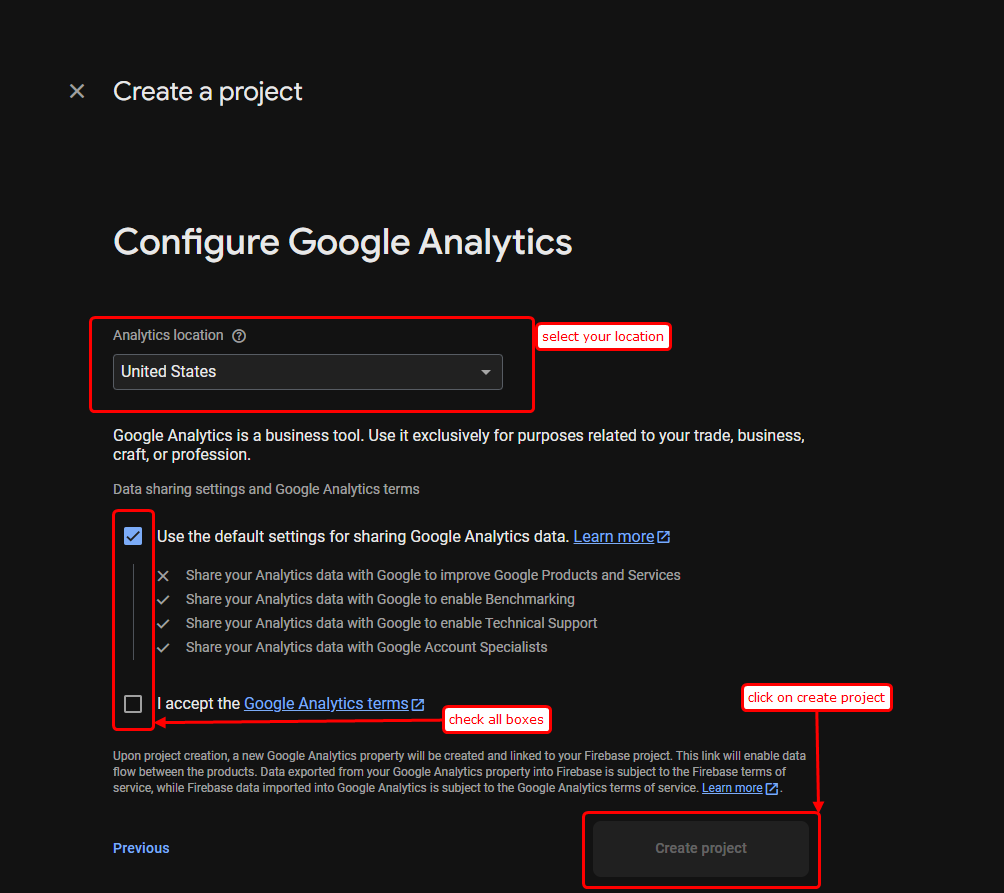
Configure Google Analytics Settings
Configure Google Analytics settings for your project to track user interactions and metrics.
Follow these steps:
- Verify your Analytics location (Indicated by the box).
- Check the Google Analytics terms checkboxes at the bottom (Indicated by the box).
- Click the Create project button (Indicated by arrow) to initiate the workspace provisioning.
Review Project Setup Options
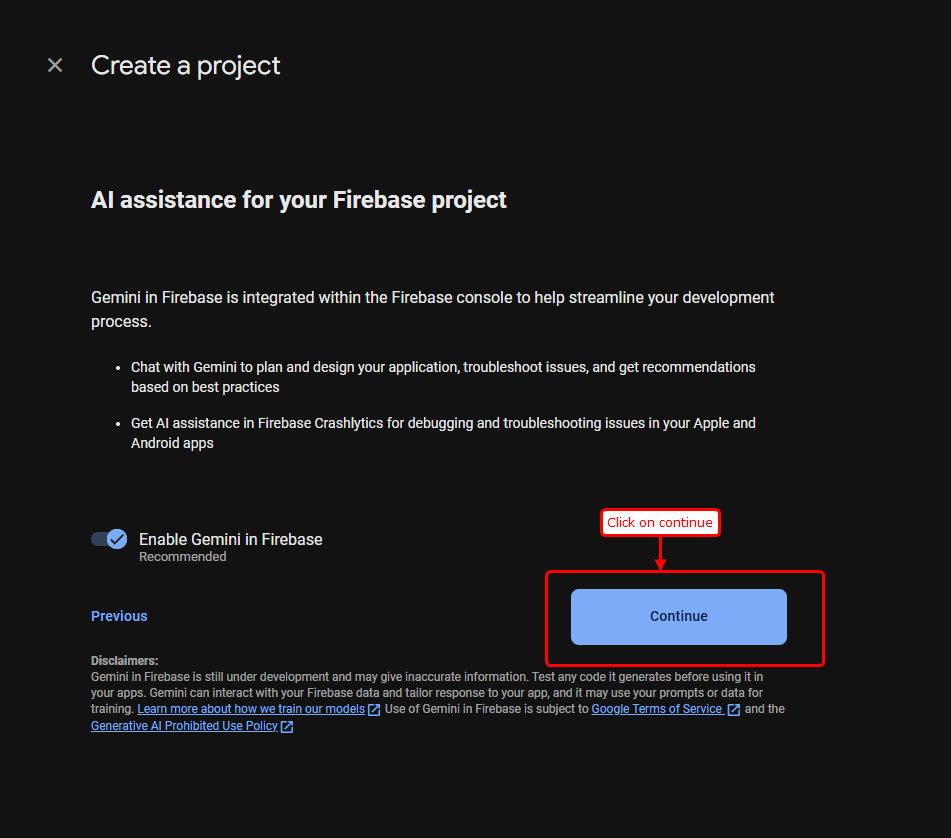
Proceed through the AI Assistance recommendations during the project initialization.
Follow these steps:
- Review the optional AI assistance features in your Firebase project.
- Click the blue Continue button at the bottom (Indicated by the box and arrow).
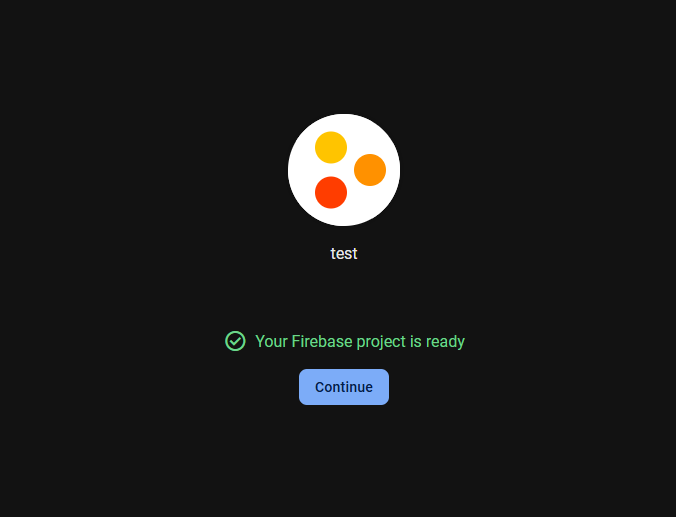
Project Creation Complete
Wait for Firebase to finish provisioning resources for your new cloud project workspace.
Follow these steps:
- Once you see the green success message Your Firebase project is ready, click the blue Continue button to enter your project console dashboard.
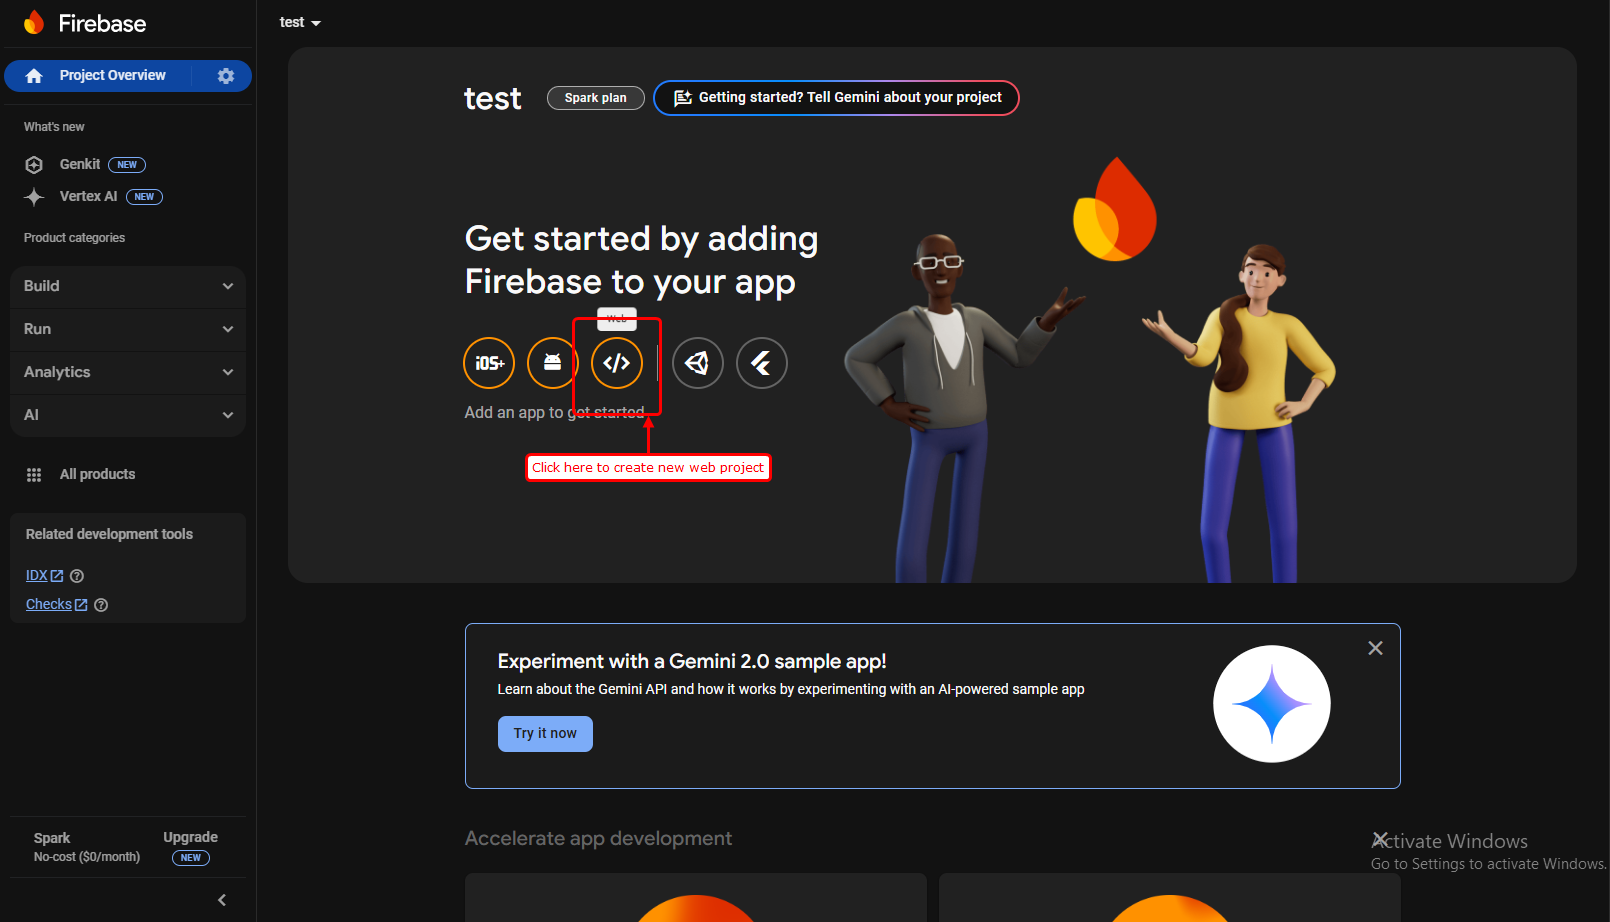
Register Web Application Instance
To link your live website domain with Firebase, you must create a Web application instance within your project settings dashboard.
Follow these steps:
- On your Firebase project overview dashboard page, click the circular Web (</>) icon (Indicated by the red box and arrow) to register your new web client app.
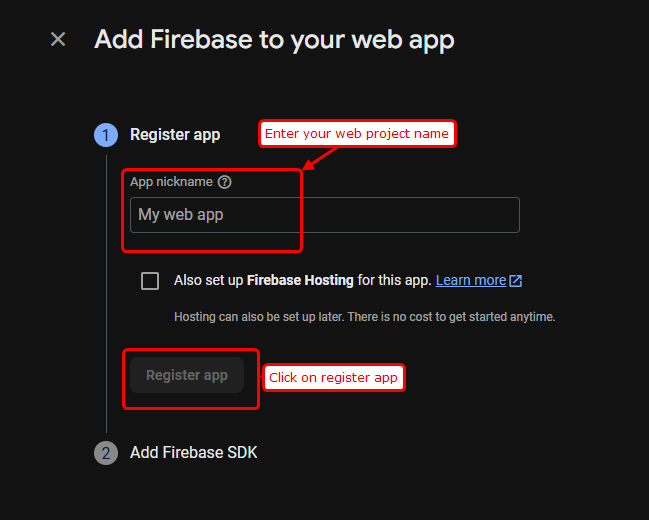
Configure Web App Name
Assign an identifier name to your web application registration.
Follow these steps:
- In the App nickname text field (Indicated by the red box), type a name for your web app configuration (e.g.,
SnapReels Web). - Click the blue Register app button (Indicated by the arrow).
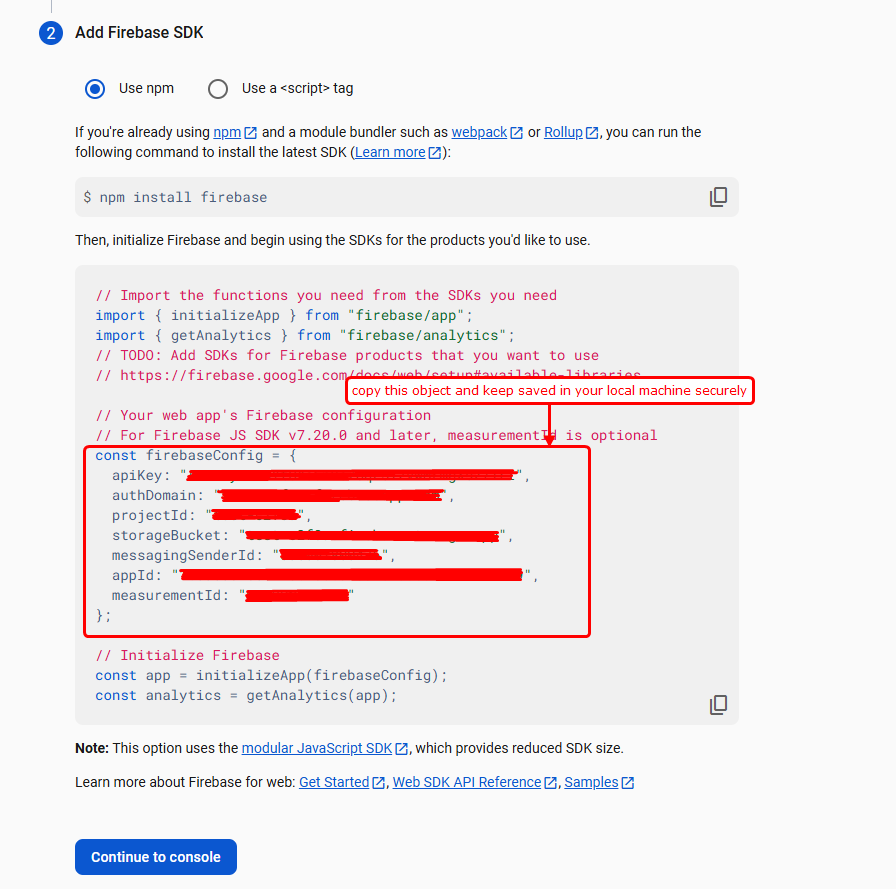
Copy Firebase Configuration Object
Firebase will generate a configuration keys object. This object connects your web pages to Firebase servers.
Follow these steps:
- Locate the
const firebaseConfigblock inside the script tag (Indicated by the red box). - Copy this JavaScript config object block (from
apiKeytomeasurementId). - Save this copied object safely in a local file on your machine, as we will paste these values into our website configuration panel.
- Click the blue Continue to console button at the bottom.
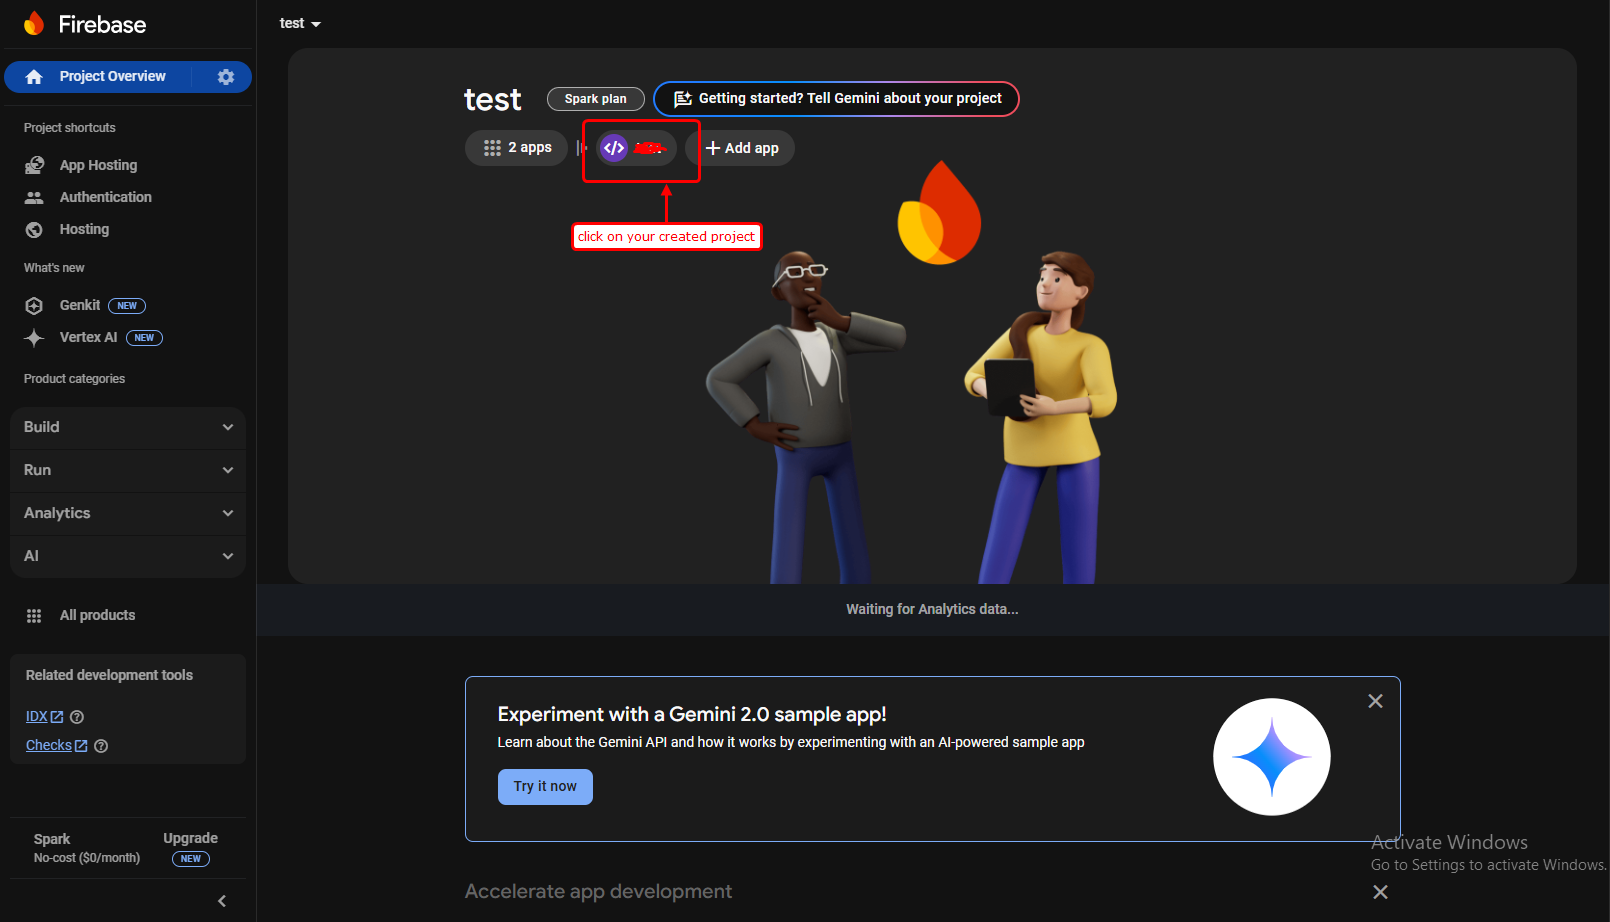
Access Project Settings Console
Configure project settings, keys, and security parameters in the management settings page.
Follow these steps:
- Click the gear settings icon next to "Project Overview" in the left sidebar menu (Indicated by the red box and arrow).
- Select Project settings from the menu options to load the settings dashboard.
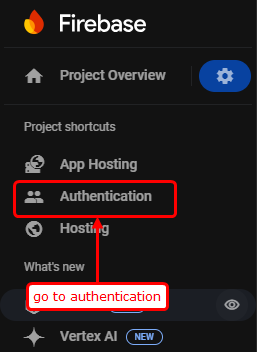
Access Authentication Configuration
Enable secure user login options (like Google, Facebook, etc.) inside the Authentication dashboard.
Follow these steps:
- In the left sidebar menu under the "Build" category, click on Authentication (Indicated by the red box and arrow).
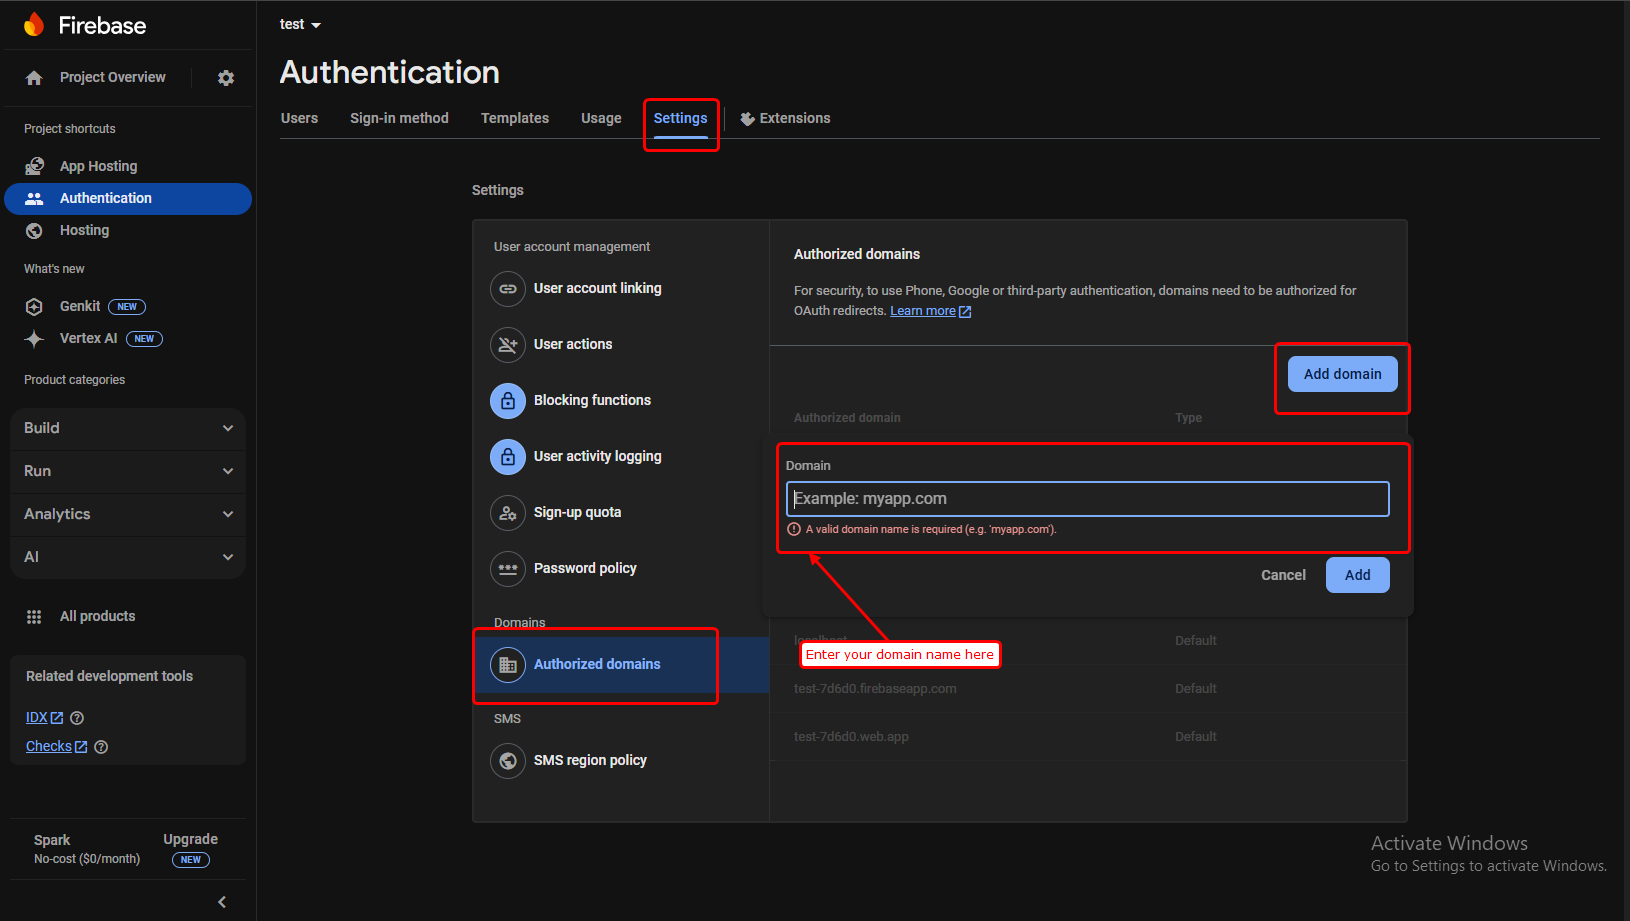
Authorize Website Domain Name
For Firebase authentication scripts to run securely on your custom domain name, you must authorize it in your project settings.
Follow these steps:
- Go to the Settings tab in the Authentication dashboard.
- Scroll down to Authorized domains.
- Click the Add domain button.
- Enter your custom domain address (e.g.,
yourdomain.com) (Indicated by the red box and arrow). - Click the blue Add button to save changes and authorize your website domain.